Here is an example of two clean poses that the computer is nicely inbetweening between. In my opinion this clean inbetweening is important for the overall success of the shot.
Notice that even though I only have two keys, the computer is already starting to inbetween my shot. Since these key poses have been carefully built you can already start to see that the arms and body are starting to follow natural arcs between the two key poses. I will start to add breakdown poses later to enhance my arcs on the arms or body and/or to define a different arc pattern if needed.
Now that those two keys are built in a clean and simple way, I can start to add in all my other keys. As I add keys I'm constantly making sure they relate to each other in the same way I did with the the first two key poses making sure the motion between each new added pose is nice and clean.
Below I have my shot blocked out to the point it's ready to show. I have the timing roughly thought out, and enough key poses to present my idea clearly.
This is a snapshot of what my dope sheet looks like for the above blocking example. Again my goal at this point is to keep things simple. I want my keys to be fence posts in my shot so that I can hang everything else off of them, at this point forward the key poses are clearly defined.
You'll notice that the entire body is keyed on the same frames this includes the arms,legs,and hands. I generally Block out the Mouth and Eyes in a separate blocking pass and do not tie them to the body keys, I treat them like they are a separate layer.
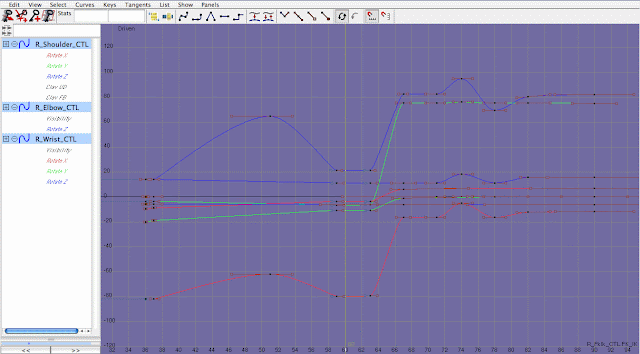
My curves at this point should be clean and simple for the entire body. I keep the knots flat unless the knot is on a sloped spline. I also always have my tangents showing and I only work with weighted tangents. I don't like the computer doing anything to my tangents that I don't want it doing. It's important that you control what is happening with your splines because this is where the power of computer animation can really shine or where the computer can destroy your shot.
Here is an image of what the splines look like for the Root of my character.
Besides keeping my splines and keys simple I also try and make sure that my character in working from all angles. I always work in the main camera and pose my character for that camera, but I'm always making sure the character's pose isn't too crazy or off balance in the other cameras. It's good to cheat when you have too, but I've found that the more your character is balanced and works from other angles the more likely your character is going to look right from the main camera. Sometimes when you just pay attention to the main cam you might be manipulating the character in such a way that looks fine because of perspective or for some other reason but in reality your character may be awkwardly posed or broken in another camera. This can lead to heartache when trying to finish your shot and you can't seem to get "that" one part looking right and you have to put in tons keys to try and make an arc look right. I find that most of the time it's because of not paying attention to my poses in the other cameras. Looking at your poses and how they relate to each other in the other cameras will help you create simple and clean poses that work together.
Here are examples of the same blocking from the other cameras, though it isn't perfect from these cameras it's not super broken either. The movement still is somewhat believable.
Front Camera
Side Camera
Top Camera


